Sunday 31 May 2009

Upcycled mailing envelopes - a tutorial


Hey everyone,

I can't take all the credit for this one, as it's a skill I picked up from an envelope I received from Shauna, of Lemondrop Studios. However, thanks to a sunny Sunday morning, my camera and the need for a small, sturdy envelope to send a PIF across the pond, here is my own take on how to change a cereal bar box into a 'do-not-bend-velope'.


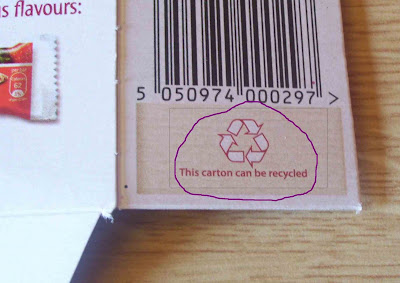
First of all, eat your cereal bars. You'll be left with an empty box, like so:


Pay attention to the packaging - this is telling me that it's okay to go ahead and recycle!


Next up, cut along one of the vertical folds, like so:


You'll be left with one long piece of cardboard. You then need to take off the entire front or back panel (up to you, you pick which). I went for the front:


If you turn the loose panel over, you can mark out where you need to trim each edge. Take about a centimetre of each side, otherwise the finished envelope will be too bulky to tape together. You also need to trim a little bit off one of the top edge, but I forgot to take a photo of that part.


Here's the same thing in inches, for my international/older readers:


Also, while you have the scissors, take off that scrappy bit at the bottom. Like this:


It's not entirely clear where I've marked it in pencil, in this photo, but you also need to cut off the corner tabs, and neaten your edges.

You can make the remaining edges look a bit more envelope-like by snipping off the corners a little. Place the trimmed front (or back!) panel onto the larger piece. We're using it that way up so our envelope is nice and blank, instead of patterned. Starting to look like an envelope yet?


Trim off the envelope's flaps where they are looking a bit raggedy. Recycled shouldn't look like it means inferior quality. All we need now is a little bit of tape. This is a bit tricky to do on your own, but if you have a paperweight, mug or heavy stapler handy, that might help you get the tape in the right place.


Et voila! A perfectly functional cardboard envelope... with a past!


Saturday 30 May 2009

New products

In between organising today's Glasgow Craft Mafia Handmade Haven at the Buff, a hectic day job schedule, completing my dissertation proposal and drafting a new zine (stand by for more news on that!), I've also found time to take lovely sunny photos of some of my new products.

I'll be putting them into my shop on etsy.com over the next few days, but here is a sneaky peek for my readers. Plus, enter the code PEEK when you check out and I'll refund 10% of your total product cost for the next 7 days only.

Drumroll please....


We have mini envelopes in shades of the rainbow, and of course security pattern, too.


I think these envelopes are just perfect for sweet little notes for your nearest and dearest. They come in at 3cm square, or just over 1.5 inches square. They're ideal for scrapbookers, or for getting creative in your photo albums, cardmaking or stationery kit.


I'm starting to get even more into scrapbooking emphemera than usual, and have been using offcuts from my envelope making to make really lovely details to embellish your work. I've been working hard on elements of my wedding decoration for later on in the year, and these shapes are playing a big role in my seating planner:


I've been making kraft envelopes for my wedding invitations, but I've also been making fern envelopes for a custom order, so we have scalloped rectangles in that pattern, too.


Even the offcuts from my offcuts are useful. These 'frames' would look great in a scrapbook or photo album. I roadtested them by offering them as a PIF in my shop (PIF stands for Pay It Forward, and means a listing offered at cost. Sellers do this in good faith, to share the good crafty vibes around, and I think it's a great tradition), and they were claimed within hours of me listing them.


I think they would jazz up a plain white envelope no end, too. What would you use one for?

Thursday 28 May 2009

Smile!

The other day I was in the mood for a right good cheering up, but with it still being before payday, I had to content myself with window shopping. Here's what I found...

Naughty Bertram, by Hardyharhar


Pretty much all of Blancucha's work captures the colour and vibrancy of one my favourite places to visit, Spain.


And on a writing tip, the descriptions in this shop (Mixed Species) made me chuckle to myself. Good work!

'Music too cool for monetary exchange' is much more positive than, you know, what they're really saying. And they upcycle!

I also heard about this crafty event, and wished for a nanosecond that I was in Toronto tomorrow. Then I remembered that I'm off to Edinburgh for a hot date with Hugh Fearnley-Whittingstall at Taste of Edinburgh tomorrow evening, and the Handmade Haven at the Buff Club on Saturday here in Glasgow.

I now consider my frown turned upside down.


Monday 25 May 2009

Great contest at maker.com

Maker.com, the partner site to Craftzine.com, is running a great contest with only days left to enter.

Now I've talked about my addiction to stationery before, but one thing I've never really 'got' is the Moleskine. I think I was put off by someone who raved about them deliriously, non-stop, and in the same way I've decided to live without chess, skiing and Nick Drake in my life, I like handmade individualist notebooks, or at the very least, something with square boxes instead of lines inside (means I can design intarsia knitting patterns as well as jot down my thoughts).

But all this might be about to change, when I see the results of this contest. And besides, who doesn't love the words 'free lifetime supply'?

Closing date is 31 May, so get your skates on! If you're like me, and possibly not going to enter this, can I recommend a handy fix of the customised Moleskines over at Asking for Trouble? Just the job if you're off to London Town soon.

Sunday 24 May 2009

May markets!

Missed Girl Industries and the Glasgow Craft Mafia at the Subway Festival? Don't despair, we'll be at the Handmade Haven at the Buff Club next Saturday. Hurray!

Friday 22 May 2009

Subway Festival 2009


This weekend, Glasgow's subway system has its very own festival. I'll be involved and I strongly suggest you keep your eyes peeled for crafty goings on in the clockwork orange tomorrow lunchtime, in between all the drama and events going on all day.

I'm also running a special offer in my shop to celebrate the occasion - just read my shop announcement for details. Like the tags above? They're upcycled from subway tickets and available here.

Plus, if you have a long weekend this weekend, I hope you have a lovely time!

Wednesday 20 May 2009

Glasgow Craft Mafia

May Flyer

Well, the mafia has been out and about all over the place - you never know where you might find us! Our local events magazine, The List, published a nice piece on us recently, featuring a photo of my handknit tortoise.

We have two markets coming up at the end of the month, the first in the Buff Club, above the Butterfly & and the Pig on Glasgow's Bath Street, and the second at our usual haunt, Mono, in King's Court (kind of behind the Tron Theatre if you were on your way to the now-defunct Paddy's Market).

Keep your eyes peeled this weekend too, for Craft Mafia members taking part in the fashion market in the West End of Glasgow as part of the Subway Festival.

Tuesday 19 May 2009

Red Treasury


Dragon House of Yuen makes beautiful rabbits and stunning treasuries. She recently featured my red mini business card envelopes in this gorgeous treasury. Available in a limited quantity, the envelopes are just the right size for cards from high quality online printers, moo.com.

Monday 18 May 2009

Rhonda's Recycled Craft Challenge

You know I like a challenge, and I consider myself an authority on making new stuff out of old stuff... Well here's something that's right up my alley!

Visit junkstop on Etsy.com before the start of June, and buy a challenge packet - which only costs 20c and includes international postage. On the 2nd of June, the packs will be posted out to everyone containing identical contents mined from landfill and the instructions for participation. You have to make something using the items you've been given, and your ingenuity, and post the results in the flickr group set up just for the contest, before the closing date of 15 July.

I've bought my packet, and a really cool looking zine of thriftshop finds, and I'm looking forward to taking part! Around 60 Etsians are signed up already, and the contest has only been underway for a few days. The winner gets a $20 gift certificate for junkstop, but I'm in it for the glory.

Saturday 16 May 2009

I like signs


I've been going through some old photos tonight and indulging my new passion for typography. These are from in and around Natchez, Mississippi.

Thursday 14 May 2009

A McEtsy treasury


I've been featured in a McEtsy team treasury, celebrating the best of Scotland. Pick up your lavender scented cat here, and check out the treasury here, while it's 'live'. And check out the curator's very cute shop at: www.littlebirddesigns.etsy.com.


Wednesday 13 May 2009

Wedding crafts


I've been fairly busy this last week or so with preparations for the wedding. I've started to make custom-sized handmade envelopes from plain brown kraft paper, which we'll stamp with our new personalised wedding stamp, before sending out with our invites at the end of the month.

I'm also getting stuck into decorations for the ceremony, which is taking place in a 17th century schoolroom. This huge wood-panelled room has floor to ceiling windows all along one side, with views onto a river and waterfall. I don't know how anyone managed to pay attention to their lessons with such a beautiful backdrop!

To complement the plain wooden chairs, I've been making pew-end decorations from nicely mis-matched sets of buttons. We'll hang them with brown ribbon on the near end of each row during the ceremony. Three down, eleven to go...


Tuesday 12 May 2009

And the winner is...

I'm delighted to announce that Carrot Coriander is my winner! I have a feeling she may even have entered by accident, but I gave everyone who signed up to my blog while the contest was running a chance to win.

I assigned everyone who did something from the list to earn points with a corresponding number for each point. I then used the random number generator to pick out a winning number (15, if you're interested) which was one of Carrot Coriander's numbers. Bizarrely, I also had carrot and coriander soup for my lunch, but I can assure you that it did not influence the random number generator!

On the way to the lucky winner is a craft pack with plenty of extras, and a handwritten zine explaining where each component came from.

For everyone else who entered, don't despair. There is a free gift with purchase for each of you, along with free shipping, on your next repurposed, upcycled, handmade treat from girlindustries.etsy.com - well done everyone!

Sunday 10 May 2009

Giveaway extended!

I received a text last night to let me know that there were problems logging in to post a comment on the blog! In light of this, I have extended the giveaway to tomorrow night, and I'm opening up entry by email to katy@girlindustries.com, as well as new followers of my blog and comment-leavers.

Good luck everyone!

Friday 8 May 2009

Security envelope art

I've been lucky enough to be featured in this round up of security envelope goodies.

http://myhandboundbooks.blogspot.com/

This blog is a great read and reminded me why I'm so addicted to stationery!

Remember (non-UK readers) there is still time to make your own mother's day wallet, and everyone still has a day and a bit to enter my giveaway contest.

Have a great weekend.

Saturday 2 May 2009

Don't be shy - enter my giveaway

Hi everyone,

In the spirit of good blogging karma, I have decided to hold a giveaway to celebrate my own recent giveaway win. And because I love fantastically interactive giveaways, there are some rules to follow in order to score extra points:

For 1 entry, you can tweet about my blog, this giveaway, or my shop in general
For an additional 1 entry, sign up to follow me on Twitter, I'm over there as girlindustries and you should be able to see a link to me in the top right corner of my blog. If you're already following me, that's cool, too.
For another 2 entries, sign up to follow my blog. That's a little bit lower down but still on the right hand side of my blog.
For 1 further entry, leave a comment on this blog letting me know where you're up to with these little tasks
and for a further 5 entries into the draw, leave a comment that gives me idiot's instructions on how to make my pictures come up bigger when I post them on this blog. You'd be seriously helping me out.

You've got all week to get busy, the giveaway will officially close at 10pm this coming Saturday, UK time.

The grand prize is a mini craft pack of the kind featured in my etsy shop, but with far more added extra goodies than usual and a little zine letting you know where on my travels I found all the bits and pieces, making it not all that mini after all. And I will ship it ANYWHERE in the world.

Friday 1 May 2009

Craft sellers apron tutorial

Last week I was in the throes of getting ready for my first big craft market of the season, and took time to pay attention to the wise and witty tips posted by Miso Funky on the Glasgow Craft Mafia blog.

I had been using my trusty cash box for the last few craft fairs I attended (and a plastic butty box before then - as you can see in the back left of this photo), but I decided it was time for a change, and the chance to nip to the loo or the bar without risking misplacing my takings.

With only 24 hours to go before the market, I didn't want to go out and shop for a cash belt, and there was no time to order one online. So what did I do? I put my upcycling money where my mouth was, and decided to make a cash belt out of household supplies.

Before I head over to Ikeahacker to share my lucky discovery, I thought I'd bring it to you first, in tutorial form. Buckle up, gang!

You'll need:

Ikea waffle tea towel (£1.76 for four, currently available in white)

A sewing machine and thread

Scissors

An iron (not compulsory but it did help me out)

Pins

Either a long length of fabric that you can make into a belt, a long wide strip of ribbon or, if you're as resourceful (ahem, lazy) as I am, your dressing gown belt.

A knitting needle or a kilt pin.


Okay. You will observe that the Ikea waffle tea towel is set out kind of like a grid. This is helpful. Lay it sideways on a table (iron it first if you're in the mood).

You'll notice that I wasn't in the mood for ironing at this point, but I did iron it before I sewed it, as it helped keep the edges in place.

You might also notice the kettle on the floor in my living room. We were remodelling the kitchen that week and making coffee/tea in the living room. Back to the instructions...


Fold up the bottom edge of the teatowel in line with the flat bit between the waffly bits, on the horizontal, just over a third of the way up. You know, like this:

This part will make up the pockets of the apron.

Next, you should be able to see a corresponding flat horizontal panel towards the top of the photo. Fold this down and to the back of the apron. This will be the channel that the belt goes through at the back, so bear this in mind when you go to place your pins - give yourself plenty of room!


The next bit is the bit where you pin everything. Going along the flat bits between the waffle bits means that you have a great guide for sewing in a straight line, and you can work out exactly where to put your pockets. I gave myself a pocket for a pen at either side, then three pockets for different size coins and one for notes.

Place your pins sideways on and you can sew straight over them:


Here's an action shot of me sewing using an actual sewing machine. You can hand sew it if you would prefer. I won't judge you.


Once you've done all your sewing (and did I mention I used a contrasting shade of purple and a zig zag stitch to stand out?), the next step is to sort out your belt.

There are lots of good belt tutorials all over the internet, but I was in a hurry so I grabbed the belt from my dressing gown. With the help of a knitting needle (because the channel was straight), I passed the belt through the channel I sewed through the back of the apron.


And voila! You're now ready to face the crowds at your next craft market.


How did Hamish get there?

Hamish the giraffe is more commonly sighted over at fellow Glaswegian crafter's internet gaff, Misofunky.com. So why did I see him, and his twin, when I was out and about in darkest Cumbernauld?


Enquiring minds need to know!